
Side control is a pinning position in Brazilian jiu-jitsu when you’re perpendicular to your opponent and are not entangled in their legs. Typically but not always you’re chest to chest with your opponent. It is one of the 6 main positions in BJJ and it’s where you end up most often after passing the guard.
But there isn’t just one perfect version of side control. Depending on what you’re trying to set up and depending on how your opponent is trying to escape you can have your arms, legs, hips and body in a number of different positions, each with its own advantages and disadvantages.
Side Control, the Video
Here’s a video I shot showing you the super basic form of side control, along with 17 more advanced variations…
For now, lets focus on how to make the basic form of side control work for you…
Super Basic Side Control
In the basic side control you’re kneeling at 90 degrees to your opponent and chest to chest with him.
Your arm that’s closest to his legs comes underneath his far arm (known as an ‘underhook’) and your arm that’s closest to his head comes under his neck with your shoulder driving into his face (known as the ‘crossface’). Your hands are typically linked together to form a closed circuit.
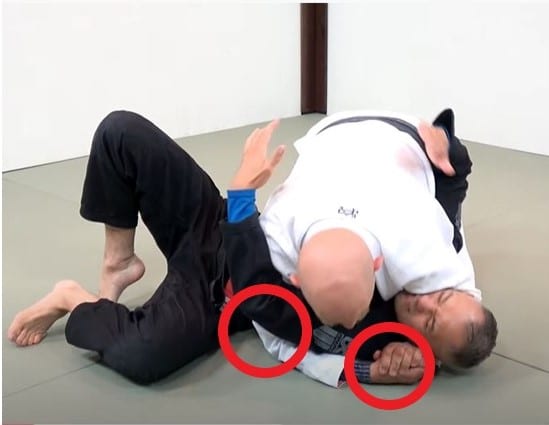
Underhook and crossface applied from the knees.
Before we move on to other variations of the side control let’s first dive a little deeper into two aspects of super basic side control: the underhook and the crossface.
The Underhook
Underhook with your bottom arm from side control
The underhook is a type of grip that you’ll use in many positions in BJJ. It occurs when one of your arms comes under one of your opponent’s arm and though his armpit.
Depending on the situation, in the underhook you’ll typically cup his shoulder with your hand, control his belt behind his back, or clasp your hands together (as you do in this version).
The purpose of the underhook in side control is to control your opponent’s far side shoulder to make it difficult for him to move that side of his body in either direction.
By controlling his ability to rotate you prevent him from facing you and getting back to his guard, forcing him to turn away as his only option which then creates the opportunity to attack with submissions and back takes.
Not all variations of side control use this far side underhook, but the bottom line is that every grappler has to have the underhook in his aresenal.
The Crossface
Crossface pressure with the top arm from side control
The term ‘crossface’ comes from wrestling where it refers to turning your opponent’s face with your forearm.
In a jiu-jitsu context when you’re applying the crossface from side control you’re not using the forearm, but the effect is the same. You use your shoulder to turn your opponent’s face away from you, twisting his spine and greatly limiting his ability to put you back in the guard.
Your ability to use the crossface effectively to break your opponents posture is one of the most important details for developing pressure with your side control.
Pressure vs Mobility in Side Control

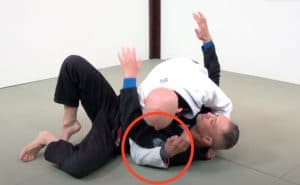
Tight and heavy side control without frames
At first many students favor a more pressure oriented version of side control and just hold on for dear life. They do this because the battle to pass the guard can be so exhausting that they don’t want to risk getting put back into the guard by leaving too much space.
A tight side control with heavy top pressure can be very taxing to for the guy on the bottom to escape because there’s so little space between bodies.
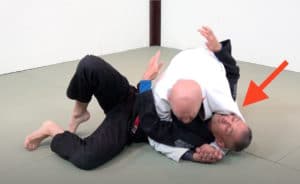
But what if your opponent does manage to establish frames from the bottom and start breaking your controls apart?
This makes it much harder for you to apply pressure from the top because he now bears your weight on his arm frames and has space to move.
Frames re-established by the man on the bottom
If you’re in danger of losing one form of side control then it’s time to embrace mobility and switch to another form of control.
Depending on the situation maybe you’ll move your arms. Maybe you’ll circle your body. Maybe you’ll move your legs. Maybe you’ll change the angle of your hips.
You can either move into a different variation of side control, or another positional hub like knee on belly, instead of just letting him put you back in his guard.
As you get better and better at these variations you’ll improve your ability to keep your opponent pinned by constantly forcing them to deal with new problems (attacks, pins, movements).
Besides, just locking someone into a position and holding them there forever is counter to the attacking spirit of jiu-jitsu.
To improve your jiu-jitsu the most master BOTH the pressure AND the mobility aspects of side control.
The Four Basic Arm Positions in Side Control
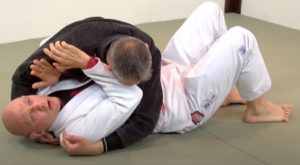
Side Control Variation 1: Underhook and Crossface
Underhook and Crossface
In this variation your arms are in the underhook and crossface arrangement that we discussed extensively in the ‘super basic side control’ section above.
To start with both your knees will typically be on the ground and your hips facing straight down, but you can definitely change that up with some of the variations we’ll look at later in this article.
Side Control Variation 2: Both Arms on Far Side
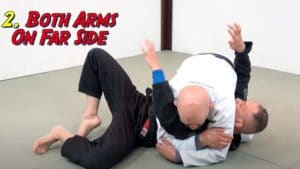
Both Arms on Far Side
In this variation you abandon your crossface so you can bring both your arms over to the far side to completely isolate your opponent’s far arm.
The purpose of this variation is to begin using this arm as a lever which sets up attacks such as the Kimura shoulder lock, the spin armbar, or a variety of other attacks and positions.
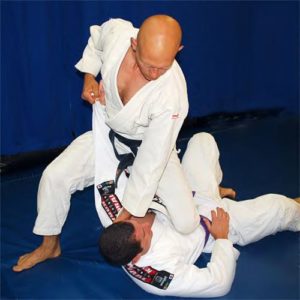
Side Control Variation 3: Top Arm On Far Side, Bottom Arm on Near Side

Top Arm On Far Side, Bottom Arm on Near Side
This variation of Side Control is typically used to create mobility or to block someone who is relentlessly trying to put you back into the guard with their near leg.
It increases your mobility by giving yourself the freedom to move yourself around your opponents’ body while using your arm to stop them from following you. Also your shoulder blocking their vision makes it easier to climb your leg into the mount position.
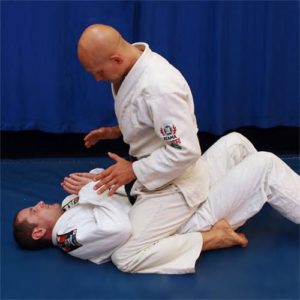
Side Control Variation 4: Both Arms on Near Side
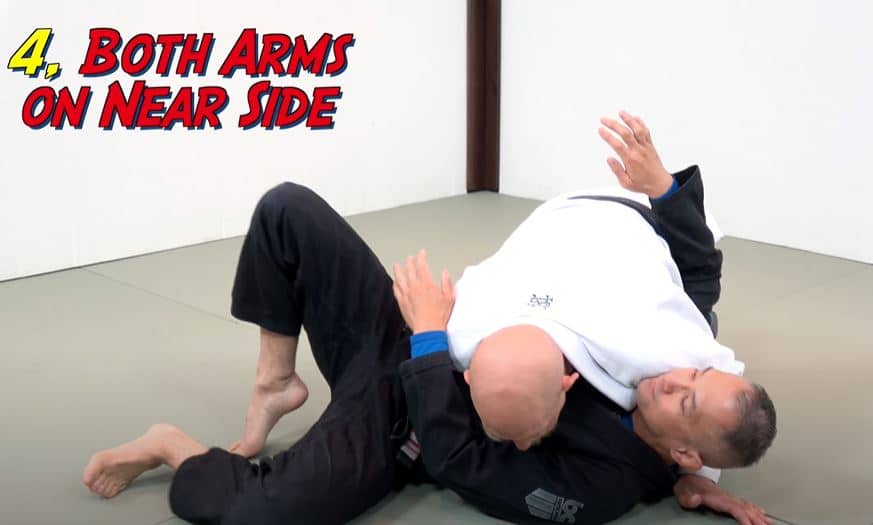
Both Arms on Near Side
This isn’t the most common variation of side control but you do see it occasionally, especially when the top player is determined to take the back of the person on the bottom.
Here you maintain the crossface but abandon the underhook in favor of blocking your opponents’ hip. Both your arms being on ones side of his body make him turning into you all but impossible.
This variation allows you to drive and push into your opponent so that you can force them to turn belly down and expose opportunities for back control while wearing them out with pressure.
The Four Basic Leg Positions in Side Control
Side Control Variation 5: Both Knees on Ground
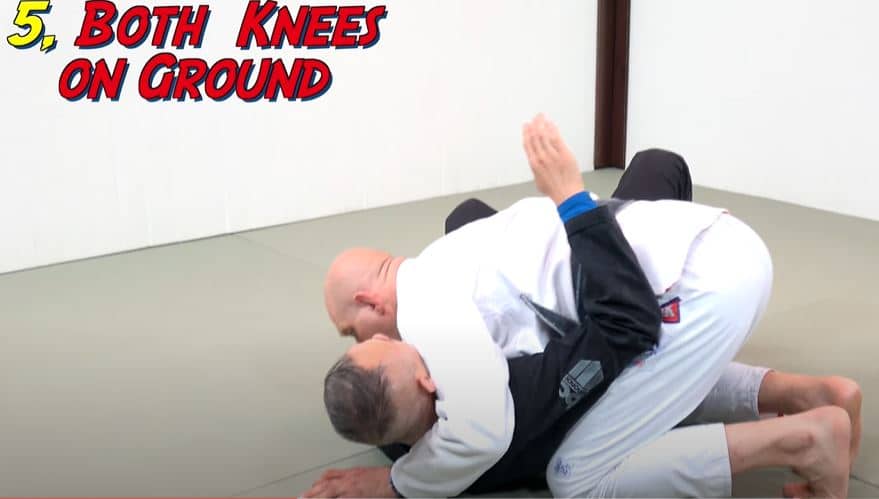
Both Knees on Ground
In side control you may have both of your knees on the ground; typically one knee will be up toward the armpit of your opponent while the other knee remains close to their hip.
This creates two wedges that help prevent your opponent from turning to face you and helps isolate his near arm for attacks.
Since your weight is mostly on your knees it does mean that your opponent will be under slightly less pressure than with other variations, but it gives you more mobility to switch your base (adjusting hip angle and your feet) and move around.
Side Control Variation 6: Top Leg Straight, Bottom Knee Down

Top Leg Straight, Bottom Knee Down
When you’re ready to put your opponent under more pressure, either to break their posture or make them uncomfortable and force them to move, you may want to raise one of your legs to create a strong post that allows you to drive your weight into them.
This posted leg also allows you to absorb the force of their bridge when they try to escape, making it harder for them to shift your weight off of them and make space.
Side Control Variation 7: Top Knee Down, Bottom Leg Straight
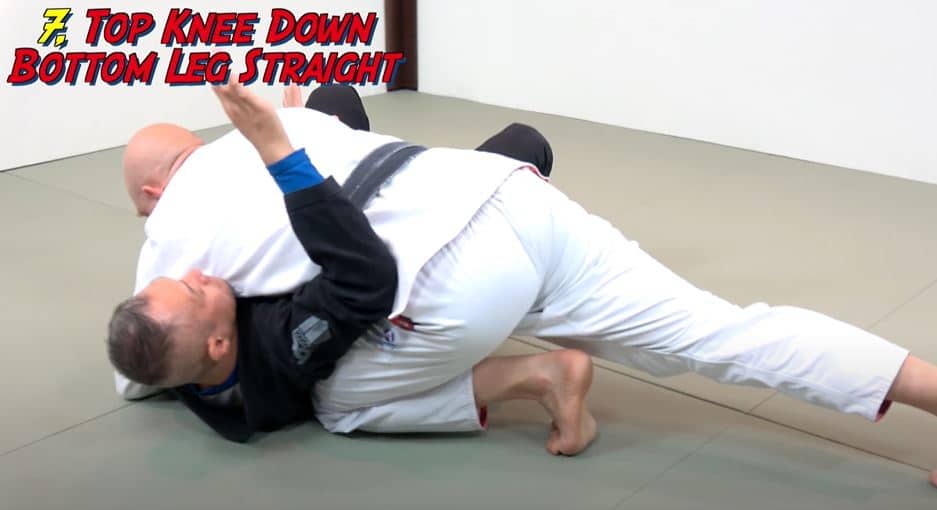
Top Knee Down, Bottom Leg Straight
This variation is almost identical to the last except now it’s the bottom leg that’s extended and the top knee on the ground.
Once again you’re able to use your outstretched leg as a post to drive off of to make more pressure, but it also allows you to create a wall with your backside against their framing arm (near side) and shoulder.
You can use this variation to create attacks on their far arm (e.g. the Kimura or Americana).
Side Control Variation 8: Both Legs Straight

Both Legs Straight
In this variation you have both of your legs straight and away from him. Since your weight isn’t on your knees anymore this increases the amount of your body weight resting on your opponent
It will also lower your center of gravity, which can be useful to prevent attempts to shift you out of balance for reversals.
This variation can be very useful if you really want to wear your opponent out, or take a breather to rest yourself. But you need to make sure you have a strong crossface because without turning his face away you leave a large gap for them to slip their bottom leg into to regain their guard.
The Three Basic Body Angles in Side Control
Side Control Variation 9: Body at 90 Degrees to Opponent
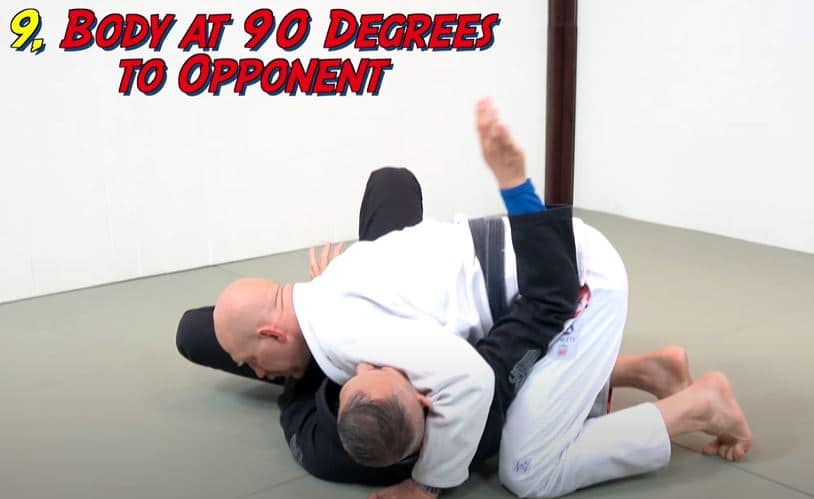
Body at 90 Degrees to Opponent
Side control with your bodies perpendicular is the most traditional form of of this pin.
This 90 degree angle allows you to control your opponent with all of the most powerful parts of your body (arms, legs, hips) while limiting their ability to face you with their own body.
At this 90 degree angle you can use any of the 4 arm variations, or 4 leg variations, that we discussed earlier in this article.
Side Control Variation 10: Body Diagonal to Opponent
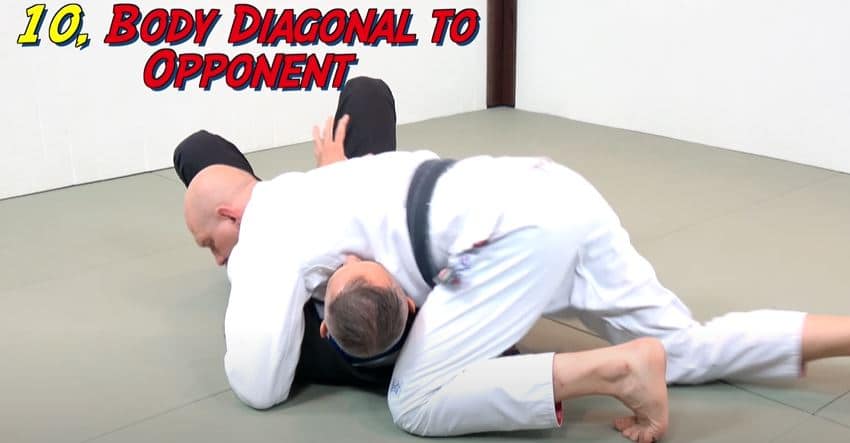
Body Diagonal to Opponent
In this variation you’ve moved towards his head from your original 90 degree position. Often this will involve a switching of the hand positions as well, most commonly to the arm over the head and hand blocking the hip configuration first shown in variation 3 above.
Typically you would switch to this diagonal configuration either to finalize attacks on their far arm or just to change angles to prevent their escape attempts.
Side Control Variation 11: Body at 180 Degrees to Your Opponent (aka North South Position)
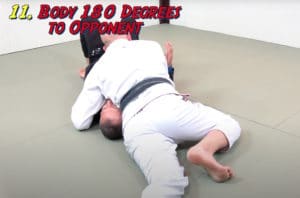
Body at 180 Degrees to Your Opponent
In this position you’ve continued rotating until you’re essentially 180 degrees to your opponent, with your head is pointing towards their feet and vice versa.
This position, also known as ‘North South’, sets up some unique attacks, including the Kimura armlock, the north-south choke, and taking your opponent’s back.
The Four Additional Hip Angles in Side Control
In all of the positions shown so far your hips have been turned down to face the mat. But having your belly towards the floor isn’t the be-all-and-end-all.
When you’re riding a motorcycle generally your bike should be upright, but if you’re cornering fast around a turn then leaning your bike is actually the correct thing to do. Similarly there are definitely times in BJJ when adjusting the angle of your hips is the correct thing to do.
We’ve already covered hips flat extensively, so now let’s look at four additional hip and leg configurations that are often useful in grappling.
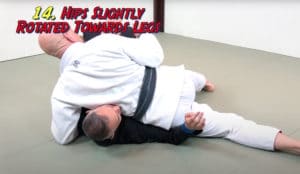
Side Control Variation 12: Hips Partially Turned Towards Head
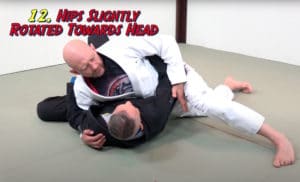
Hips Partially Turned Towards Head
In this variation you’re still at 90 degrees to your opponent but you’ve twisted your hip slightly so that the hip closer to his head is higher than your other hip, which is almost flat on the ground.
This hip position allows you face your opponent more comfortably and use both of your hands to attack his neck and arms. It also allows you to circle more effectively, both towards his head and away from it.
Side Control Variation 13: Hips Fully Turned Towards Head
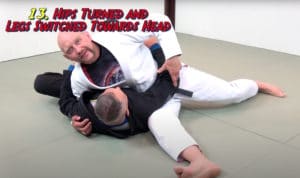
Hips Fully Turned Towards Head
Now you’ve turned the hips more fully so they are facing completely forward and you’ve also switched your legs. In the previous variation (number 12) your right leg was closer to your opponent’s legs, and in this variation that leg is now way up by his head!
Most typically you’re going to secure yourself to your opponent’s upper body by using a far side underhook and by pulling up on his near arm.
This is essentially the same position known as kuzure kesa gatame in Judo. It frustrates many of the conventional side control escapes and sets up some really cool attacks; I use it all the time!
Side Control Variation 14: Hips Partially Turned Towards Feet
Hips Partially Turned Towards Feet
Here you’ve got both legs straight (like in variation 8) but you’ve turned your hips so that it’s easier to face his legs and feet.
Typically you’re going to use this leg position with a top arm on far side, bottom arm on near side (variation 3) arm position, but that’s not a hard and fast rule.
Twisting your hips in this way gives you the ability to monitor what he’s doing with his legs and maybe set up your leglocks or mount attacks. It’s also a convenient position from which to crush his face with your ribs a little bit and induce him to move, potentially setting up a submission attack.
Side Control Variation 15: Hips Fully Turned Towards Feet
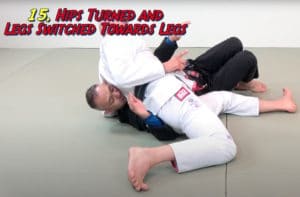
Hips Fully Turned Towards Feet
In this final variation of hip position you’ve fully turned your hips towards his feet AND switched your own legs. Your left leg (which used to be near his head) is now extended and runs beside his legs.
In judo this position is known as ushiro kesa gatame.
In BJJ this is most typically used to set up a transition to the mount but you can also use it to attack his far arm with a Kimura and/or some fancier leglocks.
Additional Variations of Side Control
Let’s look at a few other grip and leg positions variations that you might run into and/or use yourself on the mats…
Side Control Variation 16: Lapel Feed Through Armpit
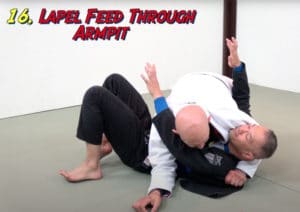
Lapel Feed Through Armpit
Some people really like to open their opponent’s lapels and feed the far lapel under the far arm, through the armpit, and hold onto it with their top hand.
(If that description doesn’t make any sense then watch the video at the top of the page at the 4:12 mark, and/or go to the same video on Youtube here.)
This armpit lapel grip makes it really tough for the guy on the bottom to turn in and re-establish the guard. As a consequence you can be reasonably sure that he’s going to turn away to try and escape, and – knowing that in advance – you can be ready to take his back with the low hook or chair sit manoeuvres (covered in the taking the back skill set here).
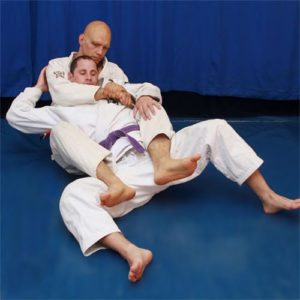
Side Control Variation 17: Armpit Grab
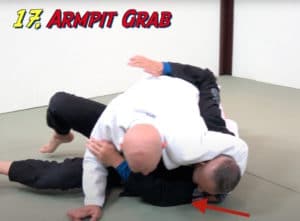
Armpit Grab
Here’s a similar variation that helps turn your opponent away from you and increase your pressure on him that works both with and without the gi.
In this position you’re still going to crossface your opponent but instead of linking your hands you grip his armpit with all four fingers of your top hand and then use that to pull him in towards you.
This makes it hard for him to turn into you and increases the amount of weight you’re placing on him in side control.
Side Control Variation 18: Partial Knee on Belly
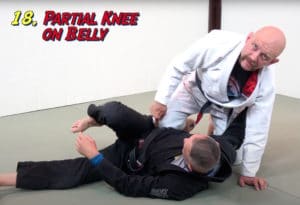
Partial Knee on Belly
The final variation we’ll cover today is when you stay low but put your bottom knee onto the edge of his hip while keeping your upper body very low (I’ve lifted mine up to show you the leg position in the picture above).
This is a hybrid position between side control and knee mount and can be confusing to people who may not have encountered it very often and thus don’t have any predetermined escapes for it.
Which Variation of Side Control is the Best?
We’ve looked at 18 different ways of doing things (that can be combined in an almost infinite number of variations) so it’s reasonable to ask, ‘which is the best?’
I would suggest starting with the first variation – the crossface and underhook.
But then, very quickly, you should become familiar with all the other variations too!
Side control isn’t a static position because your opponent gets a vote too; he’s forever countering, moving around, trying to escape…
By switching from position to position you can adapt to the energy he’s giving you and also create many opportunities to outmaneuver and set him up as he tries to recover his guard.
Each variation allows you to adjust the point of pressure for your weight on your opponent while moving around their various attempts to escape, so you should become familiar with them all.
Side Control Follow Ups
Once you have Side Control, you’re probably wondering what to do with it?
Maybe you can submit your opponent from side control, which is great; the match is over. But that’s not your only option…
It is important to remember that side control can be a much more than just a static hold for keeping your opponent locked in place (although that does have its time and place in a match).
Dominant control positions (like side control) are also meant to create movement by dictating which direction your opponent can move. By denying them certain directions of movement you can funnel your opponent into other positions or submissions.
Side Control is one of the early hubs that grant you a great deal of mobility and control, which makes it easier to enter more dominant positions like knee on belly, the mount, or back control (all of which are covered in detail in the Roadmap for BJJ book here).
Knee on Belly
Full Mount
Back Position
As you develop your skills and start to deal with more skilled opponents you’ll start to flow more freely between the variations of side control and other positional hubs such as knee on belly and mount in order to your opponent and lead him into follow up attacks.
Good luck with your future training!
Stephan Kesting
Additional Resources
If you’re curious to learn more about the 6 major positional hubs of BJJ along with the major attacks, transitions and escapes from each position check out the Roadmap for BJJ instructional that I put together.
This is bread and butter jiu-jitsu, and is equally relevant for self defense, MMA, and BJJ training.
 Another really good resource for people trying to make sense of the frames, levers, and biomechanics of jiu-jitsu is The BJJ Formula with Rob Biernacki.
This instructional is divided into 4 volumes, including the core concepts of BJJ, an analysis of the bottom position (including the guard), the top position (including guard passing), and the back position.
These are two resources that really go into detail on all the key positions and concepts that make up BJJ so you’ll have a clear mental map to help you master the art.
The post What is Side Control in BJJ and Submission Grappling? appeared first on Grapplearts.