The Clock Choke Heard Round the World
We’re going to go through my favorite step-by-step method for how to do the clock choke, but first let’s talk about a the first time I saw the clock choke and a match that changed jiujitsu…
It was in 1998 when Royce Gracie squared off against the Carlson Gracie Wallid Ismael.
At the time Royce was undefeated in 5 UFC events and, in my eyes at least, the god of jiu-jitsu. He was a magician who found a way to win every match and in doing so had inspired an entire generation of martial artists to take BJJ seriously.
But less than 5 minutes later Royce was sprawled unconscious on the mat. He had been caught in Wallid’s clock choke, refused to tap, and went to sleep.
The next day this match was the topic of conversation at every BJJ club in the world, and we were all shocked and flabbergasted to see our hero lose.
But facts are facts; nobody is invulnerable, Wallid was the better fighter that day, and all the fighting spirit in the world can’t stop a really tight choke from putting you out.
(Incidentally this was also the first time that many North Americans found out about Carlson Gracie and his tough team of fighters, which is where my black belt lineage comes from.)
When to do the Clock Choke
The clock choke is an attack that’s applied when your opponent is on his knees in turtle position and you’re above him.
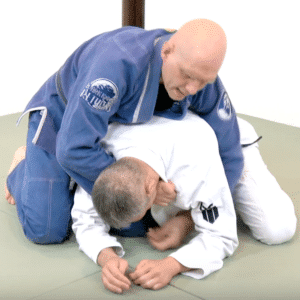
Most of the time your opponent will end up in the turtle because he came to his knees to escape sidemount, or when someone turns to their knees to counter your guard pass because no points are awarded for a guard pass if he turns to his knees. In fact the clock choke is actually easier to get in competition because people are much more desperate to prevent those point and therefore roll to their knees much more commonly against guard passes.
However your opponent can also end up on his knees after a failed takedown attempt or in a scramble.
Regardless of how he got there, as soon as you’re above him and off to one of his sides you can start threatening him with the clock choke!
In the following video I go through the basic (and still super-effective) way to do the clock choke, and then I also show you some advanced variations.
Check out the video, or scroll down to the written steps and photos below that….
How To Do The Clock Choke
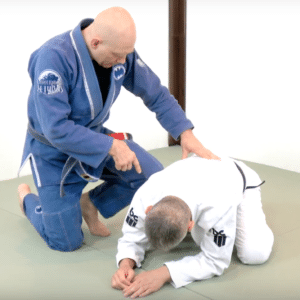
Step 1: Drive the Rear Knee In
First you want to drive your rear knee into the space between his elbow and knee. This makes it much harder for him to put you back into the guard and also allows you to disrupt the structure of his arms by using the power of your leg to shove his arms around.
Note that in the first photo my weight is up – I did this so that you can see more clearly. In a real match you would want to stay tight and keep your weight on your opponent at all times.

Step 2: Feed the Grip
Next you want to get a grip across his throat with your top hand. If you get extremely lucky you may be able to just sink that grip right away, but most of the time against a skilled opponent you’re going to have to use your other hand to feed the grip.
Take your bottom arm, the one that’s draped across his lower back, go under his armpit and pull that lapel down towards his hips. This takes the slack out of the lapel and makes it an easy target for your other hand to grasp.
(Be careful not to go too deep with your bottom arm too deeply because he could reach up, trap your elbow and roll you over. Go just as deep as you need to in order to get your hand on his lapel).
Now cut across his throat with your top hand and get a snug grip with your thumb in on his far lapel. You don’t need to be crazy tight, but every bit of slack you take out here means that much less effort required later on.


Step 3: Grip his Wrist and Start Breaking his Structure
Now that you have the grip across his throat there are quite a few different ways to finish the clock choke.
I’m going to show you the first method I learned because even now it’s still very powerful and reliable.
Switch the bottom hand from his far lapel onto his his far wrist. Grip it with all 5 fingers going over top of his wrist.
Now start pulling his wrist underneath his body; this brings his hand out of position, flares out his elbow, and greatly reduces the amount of base that he can generate from the turtle. If you think of your opponent as a table then you’ve just removed one of the four legs, which of course makes the whole thing much less stable…
Step 4: Ribs Onto Neck, Head to Ground, Walk Legs Around
Now it’s time to actually finish the clock choke!
Once again there are different methods to do this, but my favorite goes like this…
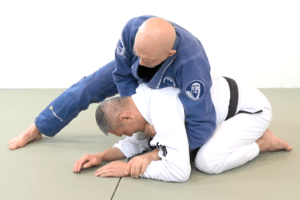
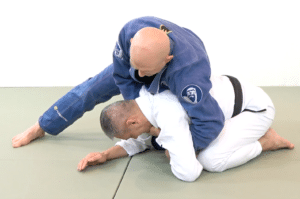
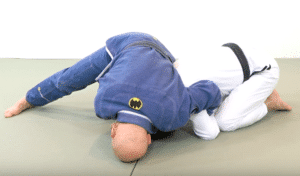
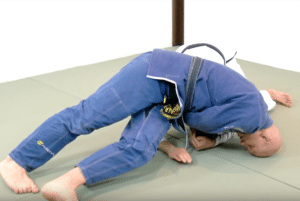
Sprawl your legs back and slide your weight forward so that the edge of your ribs are on the back of his neck. Place the top of your own head on the ground for base (if your head can’t comfortably reach the ground then you’re probably still on his body and not on the back of his neck).
Many opponents will tap at this point, but if they’re super tough then start walking your legs around like the arms of an old-fashioned analog clock. This circular walk greatly increases the pressure of the choke, so be on the lookout for your opponent tapping!

Advanced Clock Choke Variations
The method I just showed you is undeniably effective. It’s a reliable way to do the clock choke used by recreational players, black belt world champions, and everyone in between.
But it’s only one method among many. Depending on how your opponent reacts and what your preferences are you may use different grips and moves to apply the choke.
To get you started with some of those variations check out the original clock choke video again; most of the variations are in the second half of the video!
A Checklist of BJJ Techniques and Positions
BJJ can become very confusing because there are SO MANY techniques, positions and variations out there!
 But despite the amazing number of options, most of BJJ is built around just a handful of positions and techniques.
The 80/20 principle definitely applies to jiu-jitsu, because a small number of techniques and positions do most of the heavy lifting.
Learn those core moves and your jiu-jitsu game will progress much faster than if you spend your time working on novelty techniques that only work once in a while.
To help people figure out which techniques to focus on first I’ve written short, easy to read PDF called ‘A Roadmap for BJJ’. This has been downloaded by tens of thousands of BJJ practitioners and I get great feedback about it almost every day.
The best thing about it is that it’s completely free and there’s zero obligation after you download it.
Enter your email below and I’ll send you the link where you can download it for free.
Cheers,
Stephan Kesting
The post The Step-by-Step Clock Choke appeared first on Grapplearts.
