
The arm drag is one of the most versatile BJJ techniques. You can use it to take the back, sweep your opponent, set up a barrage of chokes, sweeps and submissions, defend your guard, and even just spam your opponent so he’s reacting to you rather than planning his own offense
If you’re thinking about adding the the arm drag to your game then starting in the butterfly guard is the way to go!
There are a couple reasons for this…
First, the arm drag is one of the main attacks from the butterfly guard (aka seated guard). The fact that some of the greatest jiu-jitsu competitors of all time used it regularly is proof of that. And if something works at the Mundials or ADCC then you know it’s going to work for you too.
Secondly, it’s a relatively low investment, high reward technique. Once you learn it you can immediately put it to work attacking and harassing your opponents.
And third, the arm drag from butterfly guard is a great way to learn the correct body mechanics. You can then use these mechanics in all other arm drag attacks, including from half guard, closed guard, spider guard, on your feet, and many other positions.
Let’s take a look at how exactly to train this style of arm drag…
The BJJ Arm Drag from Butterfly Guard – Video
Here’s a video taken from The Arm Drag and 2 on 1 Formula that I did with Rob Biernacki.
I think it breaks this attack down very well, including a TON more details than it is usually taught with.
Check it out…
If you prefer to learn from text, pictures and gifs then please keep scrolling to recap the same material in a different way…
The BJJ Arm Drag from Butterfly Guard – Step by Step
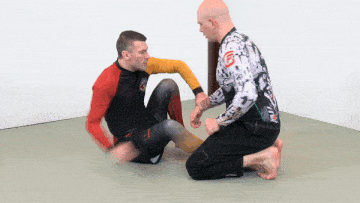
STEP 1, SECURE THE SAME SIDE HAND/WRIST AREA
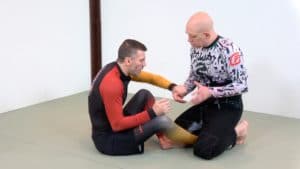
Control the same side wrist or hand
Your first step in this technique is to get control of the other guy’s wrist or hand using your same side hand. For example, grasp his right hand with your left hand.
Sometimes getting this grip is quite simple: you simply use speed and timing to reach out and grab his hand. Other times you’ll get this grip after a more intricate handfighting exchange, for example after you first bait him with your own wrist.
Getting a dominant initial grip is one of the best things you can do for yourself in any guard battle. And setting up the arm drag is no different.
Regardless of how you get there, as soon as you get the grip you immediately move to step 2.
STEP 2, PUNCH HIS ARM FORWARDS AND HOOK HIS TRICEPS
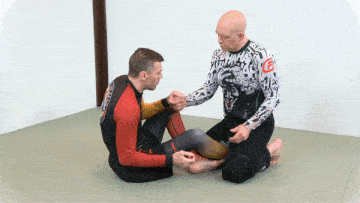
Punch his right hand forward and control the back of his triceps with your right hand
Now that you have his wrist you want to upgrade that to a powerful two handed grip that’ll allow you to complete the arm drag attack.
It involves doing two things simultaneously…
- Your hand holding his wrist punches forward, pushing his hand against his belly or his inner thigh. This anchors his arm and makes it much harder for him to simply pull it away
- Your free hand shoots up under his upper arm and cups behind his elbow or triceps. This gives you the ability to pull on his arm and internally rotate it
For clarity in the gif above for Rob shows this step as a two part movement: first punching his hand forward, and then securing the triceps grip.
In actual application, however, you want to do these two movements at the same time: your hand should arrive on his upper arm at the same time as his hand hits his belly or his inner thigh.
STEP 3, REMOVE ONE BUTTERFLY HOOK AND PULL YOURSELF TO HIS SIDE
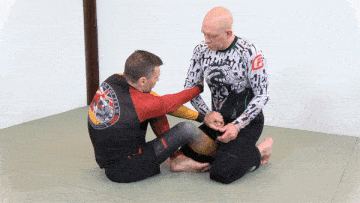
Bring your left butterfly hook to the outside and pull yourself to his side.
In step 2 you established a great big handle with which you can move your opponent. Now it’s time to do three things almost simultaneously…
- Bring your left butterfly hook to the outside so that you don’t end up blocking your progress with your own shin and also so that you set up your first hook for taking the back
- Use your grip on the wrist and upper arm to YANK your opponent forward and slightly to your right (so he doesn’t land on top of you)
- Take the weight off your butt, hang off his arm, and lift up from your feet to pull your body forward, ending up on his right side
Note that if you’re bigger than your opponent you’ll mostly be pulling him forward… if he’s much bigger than you then you’ll mostly be moving yourself… and if you’re the same size it’ll be a bit of both. All three outcomes are fine!
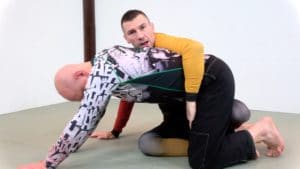
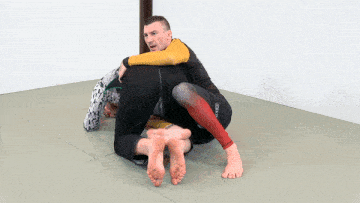
STEP 4, CAGE HIS HIPS WITH YOUR OUTSIDE LEG AND YOUR ARM
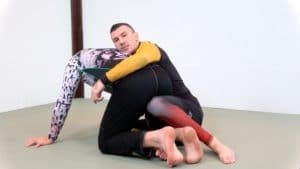
Use your left knee behind his butt to stop him from bringing his weight back again
Once you’ve yanked him forward and gotten to his side he’ll immediately realise he’s in trouble. His first instinct will be to bring his weight backwards, reconnect his butt to his heels, and reestablish good alignment in order to fight off your back take attempt.
You want to stop that from happening!
One important detail I learned from Rob Biernacki while working on our latest instructional was the idea of using your leg as a frame behind his butt to stop him from drawing backwards.
With your knee against his butt and your foot on the floor it’s going to be really tough for him to get his legs back under him.
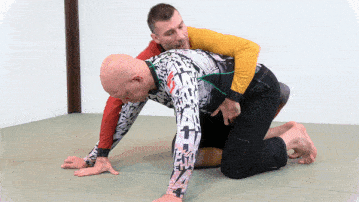
As well as controlling the forward and backwards motion of his hips with your leg you also want to control the rotation of his hips. On one side you’ll do that with your chest, and on the other side you’ll use your arm.
Here are the two main ways that you can use your arm to control his far hip…

Caging his hip after the arm drag with your hand gripping his hip
In this method you’ll cup his far hip with your hand.
This makes it hard for him to rotate away from you and also allows a very strong pulling motion to tip him over in the steps to come.
Caging his hip after the arm drag with your hand inside his far leg
If your opponent is smaller than you, or if your arms are particularly long, you may be able drape your left arm over his hips and insert your hand inside his leg.
This control is similar to a spiral ride in wrestling, and makes it even harder for him to roll away from you.
Now with your leg preventing him from shifting his weight backwards and your arm preventing uncontrolled rotation of his body you’ve achieved what I like to call ‘caging the hips’.
You’re now in a very good position to finish the armdrag with a variety of techniques.
Which followup technique you use depends on the resistance that he gives you.
FOLLOW UP 1: OPPONENT POSTS, TAKE HIS BACK DIRECTLY
If your opponent stays posted on his hands then take his back directly!
Sometimes your opponent will plant his hands on the floor in an effort to fight his way back to his feet. By doing so he leaves the space between his arms and his legs wide open, giving you an easy route to his back.
To take his back you’ll now…
- Transfer your right hand from his upper arm to the floor
- Pop your hips up
- Replace your left hand on his hip with the insertion of your left leg
- Connect your hands in the seatbelt, left hand coming over his right shoulder, and right hand coming under his left armpit
At this point you’ve got control of his upper body with your seatbelt grip and control over his lower body with your hooks. The match-ending rear naked choke (or an assortment of other submissions) is now within grasp.
This is the simplest, best case scenario, and you’ll be amazed at how often it happens in sparring!
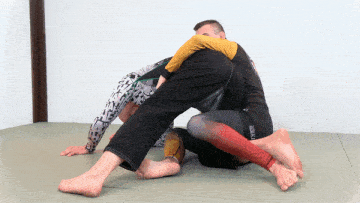
FOLLOW UP 2, OPPONENT TURTLES, TAKE HIS BACK USING INTERNAL ROTATION OF HIS LEG
If your opponent turtles up with his elbows close to his thighs then it’ll be MUCH harder to pop onto his back the way you did in the finish shown above.
Your odds of achieving rear mount will go up dramatically if you can first collapse your opponent’s base and tip him onto his side.
In this follow up you’ll collapse his base is to use internal rotation of his near leg. Basically you’ll be forcing his knee slightly outwards and his foot inwards, towards his groin, which will greatly reduce his ability to resist your pulling motion.
The first step is to keep your knee against his butt and your grip on the far hip, but then weave the foot of your other leg over his near leg and lock your instep against his instep.
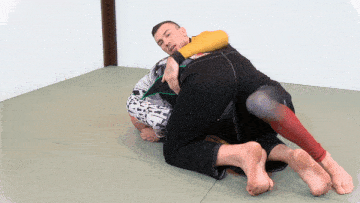
Weave your right foot over his right ankle…
Once you’ve weaved your inside leg through you’re going to do four things in close succession…
- Kick your entwining leg straight to rotate his leg inward
- Pull hard on his hip with your hand
- Scoot backwards so that he doesn’t land right on top of you
- Insert your second hook and establish your seatbelt grip with your hands.
And now – VOILA – you’re in rear mount!
Internally rotate his leg, pull his hip, scoot backwards and then insert your hook to take his back
If you’re confused about internal rotation here’s what the leg action looks like without all the arms in the way…
Arm free detail: in this context internal rotation means kicking your right leg straight to rotate his right leg inward
Notice how Rob’s leg kicking straight brings my foot under my base and greatly reduces my ability to oppose any backwards pulling motion.
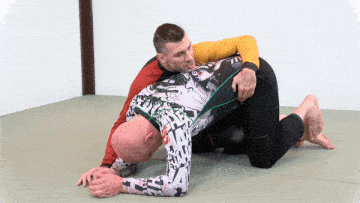
FOLLOW UP 3, OPPONENT TURTLES, TAKE HIS BACK USING EXTERNAL ROTATION OF HIS LEG
Another option when your opponent turtles after the initial arm drag is similar to the option shown above, but instead of internal rotation you’re going to do the opposite and use external rotation (i.e. rotating his leg outward) to destabilise him.
Your first step is going to be some fancy footwork in which you use your inside foot to push his trapped leg slightly outward, and then hook his leg with the heel of your outside leg.
Use your right foot and left leg to set up for external rotation of his near leg
This footwork might seem complicated, but really it’s just two simple adjustments that’ll be easy to do after a little bit of drilling.
Once you have his outside leg controlled you are going to…
- Scoot backwards while dragging his heel sideways with your rear leg.
- Pull hard on his hip with your hand
- Scoot backwards so that he doesn’t land right on top of you or use a backstep guard pass on you
- Insert your second hook and establish your seatbelt grip with your hands.
Pull his ankle outwards to externally rotate his near leg, collapse his base and take his back
You’ve now achieved the rear mount again!
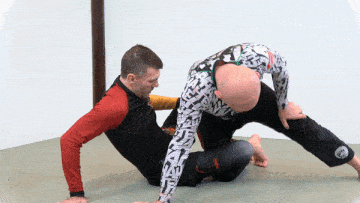
FOLLOW UP 4, OPPONENT ROLLS SIDEWAYS, JUMP OVER HIM AND TAKE HIS BACK
Jump over him just as he starts to roll to get to the back
Sometimes your opponent will realise that he’s in trouble and try to roll sideways, usually trying to put you into his guard or half guard.
But since you now know this is a common reaction you can prepare for it!
You’re already connected to his far hip with your arm that is draped over his body. So as soon as you feel the roll with your arm it’s time to move.
Immediately jump over and put your shin against his far thigh. Do NOT try to put your hook in at this point, because if he’s rolling fast your foot can hit the ground and create enough room for him to escape.
At the same time as you’re jumping over him also establish the seatbelt control on his upper body. Use this grip to pull him over top of you until you can insert your second hook.
This is a very dynamic looking movement but if you’ve trained it before and know the details then you’ll hit it quite frequently.
Go back to the 5:12 mark of the video at the top of this article to get a detailed breakdown of this strategy.
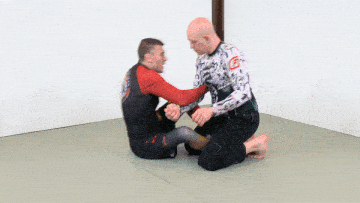
FOLLOWUP 5, OPPONENT PULLS GUARD, COME TO THE TOP
Opponent pulls guard immediately so follow him and establish top position
A final common response is for your opponent to immediately pull guard the moment that you establish the initial arm drag grip.
Usually this is an experienced opponent who’s had his back taken with this move before and would much rather fight you from his guard than try to escape having you in the back position.
The gif above is a pretty fair representation of how fast this change of positions can go in a heated match.
If this is the reaction you get don’t worry – simply come to the top and immediately start working on your guard passing. In BJJ competition you even get 2 points for sweeping your opponent, so life is good.
Training The Arm Drag and the Followups
This is a long article with a lot of steps, and I realise that this much mateterial may seem overwhelming at first.
Honestly though, I assure you that this one of the bread and butter for many people, myself included, so it’s definitely possible.
The basic stages are…
- Learn the steps in slow motion,
- Rep the steps until you can do them fairly smoothly and continuously against no resistance
- Create games and specific sparring drills that allow you to isolate specific aspects of the technique (such as getting the initial grip, finishing once you have the grip, etc).
- Incorporate the technique in full on sparring.
Then, as you start using the technique in live training you’ll need more answers to the problems and other types of resistance you’ll inevitably encounter. That’s where the four other follow ups (and a whole series of armlocks, chokes and leglocks that we didn’t go into) come into play.
A Drill to Make Your Arm Drag Attacks Razor Sharp
Here’s a fantastic drill called ‘The Arm Drag Game’ that’ll make your arm drags fast and instinctive.
How to do the drill is explained from 0:00–3:36, and then it’s demonstrated at live speed from 3:36 to 6:40.
Incidentally, this approach to developing certain aspects of your skill set is called gamification, and it’s a tool that can be applied to almost any aspect of your training.
Check it out here…
A Deep Dive into Arm Drag Entries, Follow Ups and Training Methods
If you want to get really good at this attack then I can’t recommend The Arm Drag and 2 on 1 Formula instructional highly enough.
This 4 volume instructional gives you exact step-by-step gameplan to dominate your opponent from guard in BJJ and no gi grappling using two different forms of elbow and wrist control, the first of which is the arm drag.
In this instructional renowned BJJ instructor Rob Biernacki and I show you…
- How to use hand fighting to control your opponent from the open, closed and half guard,
- How to use these positions to take the back, choke, sweep, armlock and leglock your opponents,
- What to do if someone is much bigger than you and trying to power out of your techniques,
- Drills and training methods to make the techniques fast and absolutely instinctive,
- Combinations for your attacks so that your opponent is always on the run,
- The simple adjustments to use this material in both gi and no gi settings,
- And much more!
Click here to check out this super-useful instructional. It’s currently on sale and I guarantee that you’ll be choking out a LOT of people with this material!
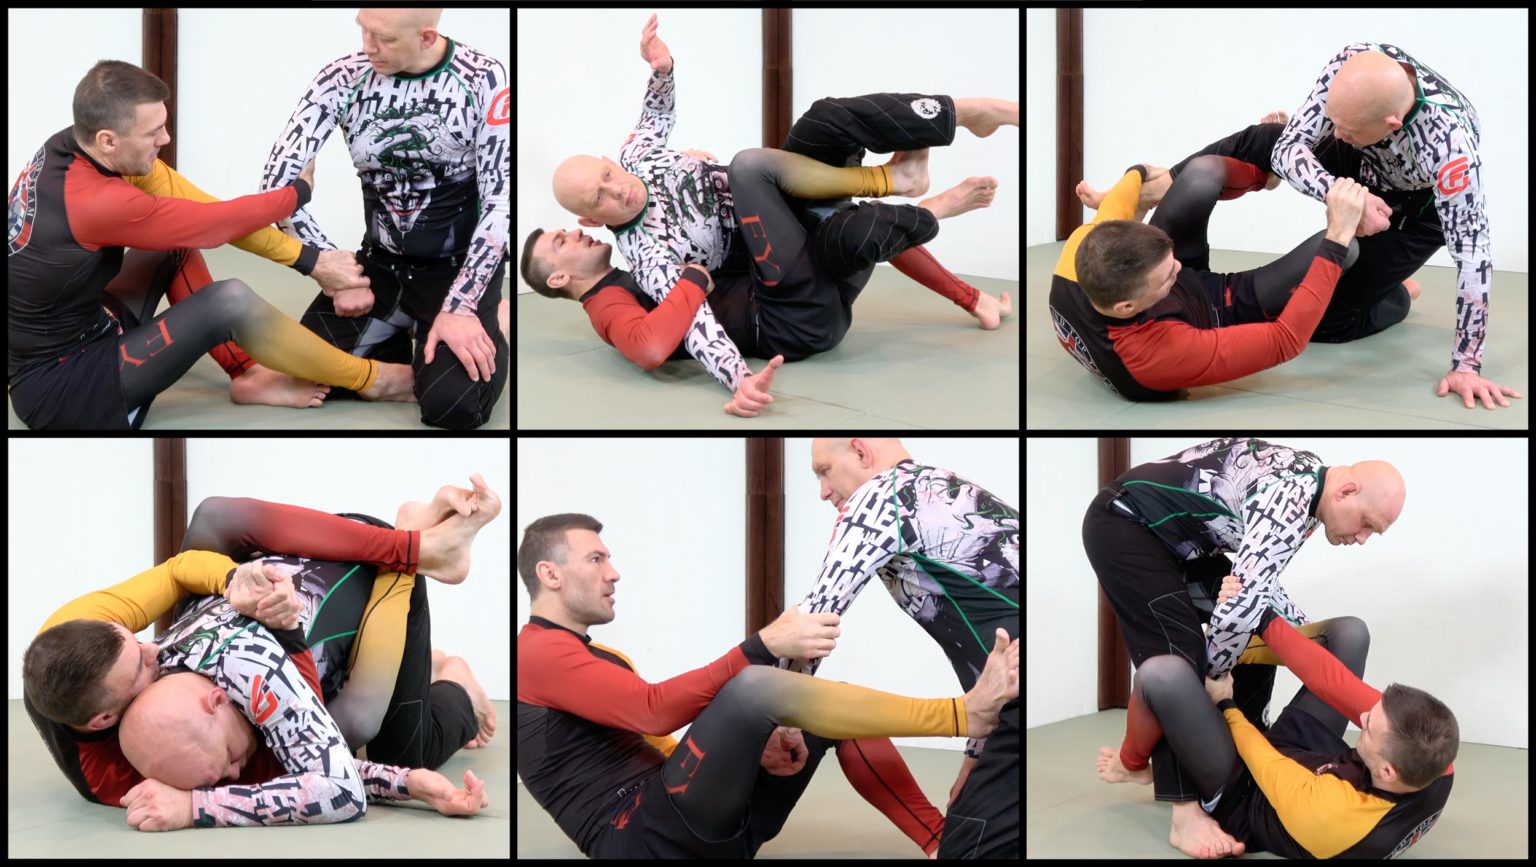
Scenes from The Arm Drag and 2 on 1 Formula

Excerpts from the 50 page comic-style reference guide that comes with the instructional.
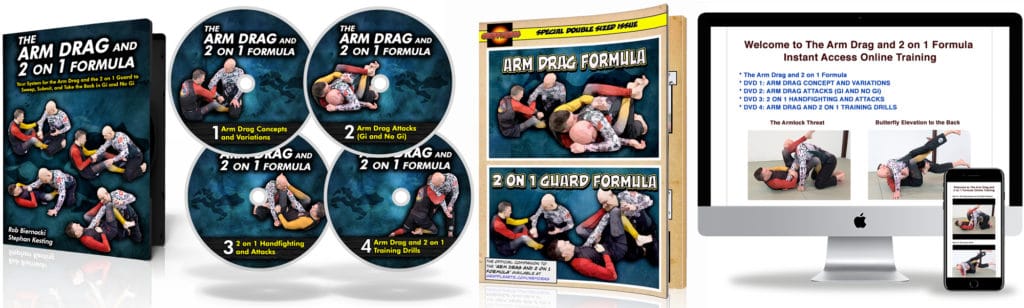
The Arm Drag and 2 on 1 Formula in DVD, book, and online streaming format
The post The BJJ Arm Drag appeared first on Grapplearts.