
Most grapplers know how to apply the Kimura armlock on the far side of their opponent’s bodies. It’s an attack taught at white belt that you see in every grappling competition.
And many intermediate grapplers don’t know that you can actually use the Kimura technique on both sides of your opponent’s body.
But the near side Kimura is an absolutely critical position for controlling your opponent. This is especially true in no gi when you have far fewer handles.
In this article I’ll show you how to use that alternate gip Kimura to set up different submissions (armbar, side triangle choke, etc) and how to use it as a big giant handle to move your opponent all over the mat!
Near vs Far Side Kimura Video
First, here’s the video that the rest of the article is based on.
Check it out because it breaks down the difference between getting the Kimura grip on the two different sides of your opponent’s body and what you can do with those gips…
The Far Side Kimura
Most grapplers learn about the far side Kimura long before they’re introduced to the near side Kimura.
The classical far side Kimura starts by controlling the arm that’s furthest away from you when you’re in side control.
Let’s say you’re in sidemount on your opponent’s right side. In this case you would control your opponent’s far (right) wrist with your bottom (left) hand).
Far Side Kimura Grip – Controlling the wrist
From here you can move on and finish the submission by locking your arms into the chickenwing configuration, adjusting your grips if necessary, tightening the lock and then finishing it using the power of your legs and body.
I go through applying the far side Kimura submission starting at about 0:08 of the video above.
Far Side Kimura Armlock 1 – Locking the grip
Far Side Kimura Armlock 2 – Finishing the lock
To help you with the far side Kimura here’s a popular Youtube video of mine demystifying the gripping sequence for the lock…
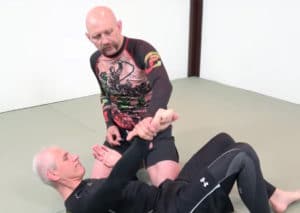
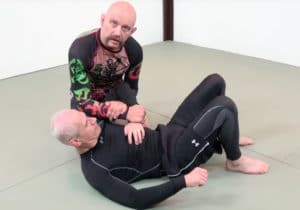
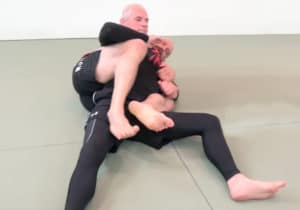
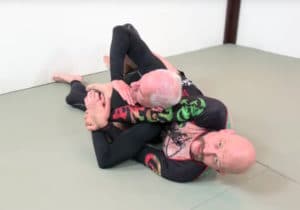
The Near Side Kimura Grip
In the far side Kimura we talked about just above you controlled your opponent’s far (right) wrist with your bottom (left) hand).
For the near side Kimura you flip things around. Now you grip his near (left) wrist with your top (right) hand. Bring your other (left) arm under his forearm and grip your own wrist to complete the grip.
The near side grip Kimura is covered at about 0:40 of the video near the top of this page.
Near Side Kimura Grip 1 – Gripping the wrist
Near Side Kimura Grip 2 – Locking the grip
Kimura Armlock Finishes with the Near Side Grip
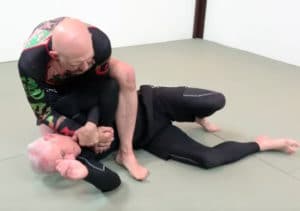
You can definitely finish Kimura armlocks using the near side grip, but it’s hard to do it staying where you are. Typically you first have to circle around towards his head first.
Once you’ve circled 90 degrees to face his legs you can finish the Kimura in a kneeling position, in a lying position (in what I call the Lazy, Old, Fat Man Kimura), or transition to other attacks like the clock head scissors neck crank.
This triple threat sequence is covered at 3:03 of the video near the top of this page.

Kneeling Kimura from North South
Lazy, Old, Fat Man Kimura
Clock Head Scissors Neck Crank from Kimura Grip
Here’s a more detailed breakdown of how to do the lazy, old, fat man Kimura. I use it all the time even though I’m not lazy and not too fat…
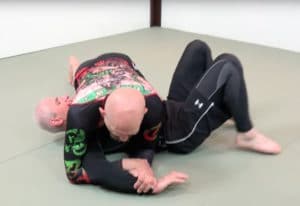
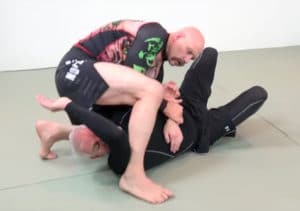
Near Side Kimura to the Back (using the Chair Sit)
The near side Kimura ties up your opponent’s arm so he can’t block your movements as easily. It also effectively gives you a very powerful lever that you can use to jack him up onto his side.
Once he’s on his side you can then step over his body while maintaining your Kimura grip and use the ‘chair sit’ mechanism to take his back.
The basics of the chair sit include sitting your weight down onto the buttock of the leg that’s over his body, using the control of his upper body to roll him to the other side, and swing your other leg into place.
This transition is covered at 1:55 of the video near the top of the page.
Kimura to Chair Sit Back Take 1 – Step over the body
Kimura to Chair Sit Back Take 2 – Sit back and take the back
To give you some more context on this move, here’s a section of The BJJ Formula in which Rob Biernacki breaks down the chair sit back take in more detail for you. Most typically you do this from a harness or over-under grip, but you can use the Kimura grip just as easily.
Note that when you use the chair sit with the near side Kimura control you usually end up on what’s called the ‘weak side’ of the back.
The weak side of the back isn’t worse than the other side, it’s just different.
Here’s an in depth video breakdown of how to control and attack from the weak side of the back. This entire video, broken up into chapters, is also available 100% for free in the Grapplearts BJJ Master App for iOS and Android. Click here for more info and for the download links.
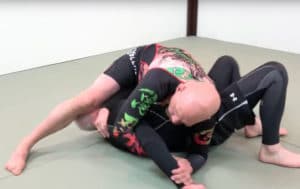
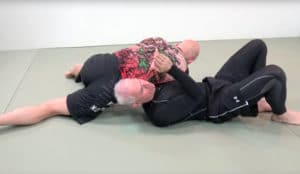
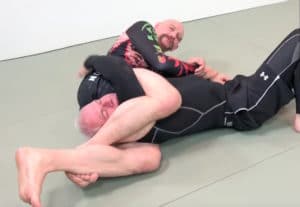
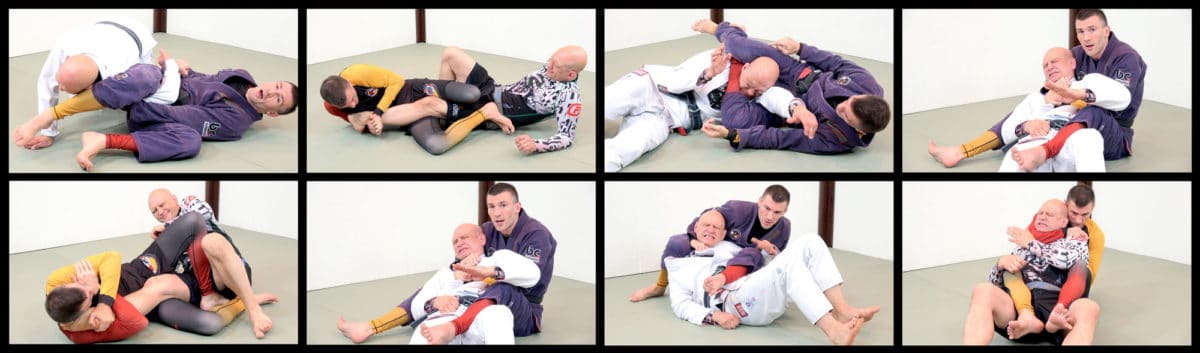
Near Side Kimura to Armbar
As I mentioned above, the near side Kimura grip gives you a very strong handle to move your opponent around with.
With this grip locked on his upper arm basically becomes a giant lever which you can use to roll him onto his side.
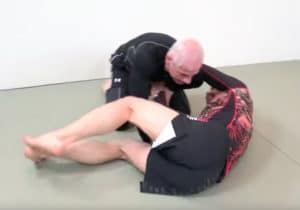
Once he’s on his side you can bring your bottom knee up onto his ribs, then swing your top leg over his face, and finally sit back to finish the armbar using extension, rotation and compression to make that armlock as tight as possible.
This armlock is covered at 2:25 in the video at the top of the page.
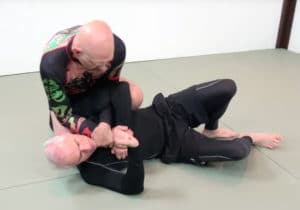
Kimura to Armbar 1 – Knee onto ribs
Kimura to Armbar 2 – Swing leg over head and sit back into armbar
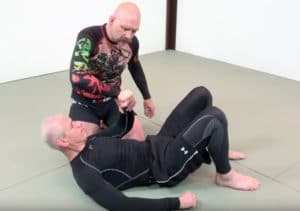
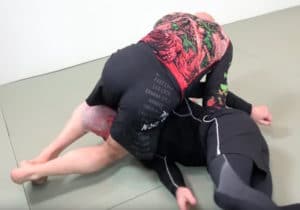
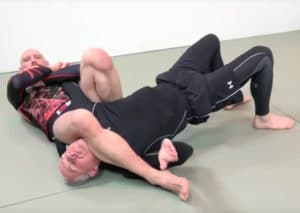
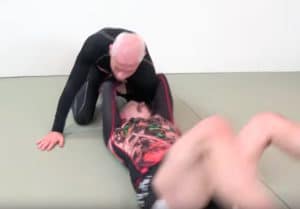
Near Side Kimura to Side Triangle
It’s quite possible that your opponent will attempt to block your armbar by preventing your leg from coming over his face.
If he does that then he might open himself up to one of my favorite attacks, the side triangle (or yoko sangaku).
To do this attack you step or swing your top foot into your opponent’s far armpit. Then you fall onto your side, pulling him towards you with the Kimura grip while kicking your other leg underneath his body.
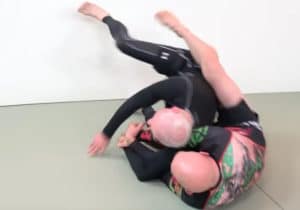
To finish the side triangle choke you adjust your legs so that your top foot is behind your bottom knee and your opponent’s neck rests on your bottom thigh like a chopping block.
This attack sequence is covered at 2:35 in the video near the top of this page.
Kimura to Side Triangle 1 – Step into armpit
Kimura to Side Triangle 2 – Fall back and kick into triangle choke
If you want more details on the side triangle choke check out the video below on the different styles of triangle chokes. The side triangle section starts at about 2:42.
Kimura Roll to Back
One of the beautiful things about the Kimura grip is how versatile it is and how much control it affords.
If you’ve got the Kimura locked on then your opponent is in serious trouble. This is true even if you lose the top position.
Here’s one of my favorite new moves to capitalise on having this grip locked on when you’re on the bottom – it’s called the Kimura roll.
The first time I saw it I thought, ‘This is just something fancy that someone dreamed up – this move will never work.’
Then someone hit it on me several times, even though I was trying as hard as I could to resist. After that I had to take it seriously and even started using it myself.
Let’s say that you’re on the bottom but have the Kimura locked on your opponent’s top arm.
Shrimp your hips away to make some space, then swing your legs around like a giant pendulum. Keep your grips tight and continue around until you tip him over and come up behind him.
From here you can take his back, end up on top, etc.
I cover this attack at 3:35 of the video near the top of the page.
Kimura Roll Backtake 1 – Grip locked and on your side
Kimura Roll Backtake 2 – Swing your legs away
Kimura Roll Backtake 3 – Continue the swing until you end up behind him
Kimura Roll Backtake 4 – Insert hooks to take the back
If you want more details about this super-cool swinging Kimura back take then check out the video that my friend Blair Turton has put out…
Drilling the Kimura as a Position
In this article I’ve emphasised that the Kimura is more than just a submission. It’s also a hub position, which is to say it’s a position from which you can control your opponent and transition into other positions and submissions.
This idea of the Kimura a position is illustrated really well in the following narrated sparring footage from the Grapplearts instuctional The Submission Formula in which BJJ black belt Rob Biernacki focusses on using only the Kimura grip.
This sort of isolation sparring is incredibly important if you want to provide focus to your sparring and we cover it quite extensively in The Submission Formula.
The Submission Formula with Rob Biernacki and Stephan Kesting
If you like understanding the biomechanics and underlying concepts behind your BJJ then check out the latest Grapplearts instructional. It breaks down how to make all your submission entries, controls and finishes MUCH more powerful.
It’s called the Submission Formula featuring Rob Biernacki and Stephan Kesting (that’s me!). Find out more at grapplearts.com/submissionformula
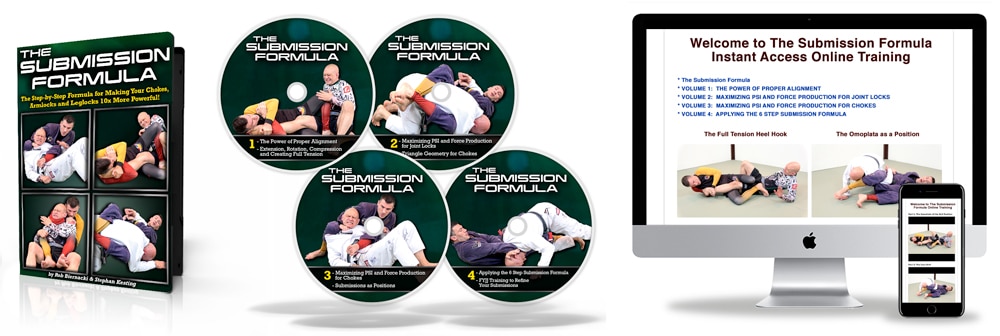
The Submission Formula, available in DVD and instant access online formats
The Grapplearts Email Newsletter
Did you know that I send out the most kick-ass email newsletter in all of Brazilian Jiu-jitsu?
These email lessons are also 100% FREE – you will never be charged for them.
Below are a just a few topics that I cover in my emails. Most are applicable to any kind of ground fighting, whether you do BJJ, submission grappling, MMA, Judo, etc.
- The guard posture mistakes that’ll get you killed on the mats,
- The six positions you must know in groundfighting
- The biggest mistake people make with their chokes
- How NOT to do the closed guard (and how to correctly transition to the open guard)
- How to stay injury free in a highly physical sport,
- The seven things every blue belt must know,
- Why talent is totally over-rated in BJJ
- How to triple your endurance on the ground,
- And a ton more.
If you to receive these tips by email and get a copy of my Roadmap for BJJ Book as an instant download, COMPLETELY FOR FREE AND WITH NO OBLIGATION EVER, just enter your name and address below…
Stephan Kesting
The post Near vs Far Side Kimura Armlocks appeared first on Grapplearts.